Saturday, July 30

Forever

Happy Saturday fellow crafter!  Today's card features a remnant from another card I made early last year (click here to see).  The technique is called "kaleidoscope" wherein an image is stamped several times, cut to different sizes then stacked together to form one image.  I saved the negatives of those images, and did the same technique. 


I don't know the brand name of this image.  I bought it in a flea market several years ago.  If you happen to know, please leave me a comment, and I thank you in advance.


I sprayed the background with Shimmer Spritz, then inked the edges with Tim Holtz Distress Ink pad in Black Soot.


Materials used:
cardstock/dp:  Wassau, The Paper Company, leftovers
image/sentiment: Fiskars, main image unknown
ink:  Ranger, Tsukineko
tools:  Spellbinders, Cricut, Martha Stewart corner punch
embellishments:  rhinestones, Robin's Nest
adhesive:  Scotch, Zots, mounting tape

'Til next blog!

Friday, July 29

Movie World

Hi everyone!  I know I should scrapbook more often... but it just takes more time (and effort!) to make one 12 x 12 page.  I'm glad that somebody invented digital scrapbooking, so when I'm in the mood for it, I can make a page or two in a shorter period of time.

And for something different this week, I made a digital scrapbook page of my nephew from Australia, during his last visit to Movie World.  I used a freebie kit from Shabby Princess called "Happy Go Lucky".


Materials used:
software:  Memory Mixer
all elements:  Shabby Princess (Happy Go Lucky)

'Til next blog!

Thursday, July 28

The Most High

Hello crafty friends!  Today is extra special because I'm a guest designer for Our Daily Bread Designs' Stamping In Time Challenge (SNTODBD40).  Aside from using ODBD stamps, we are to use doilies in our projects.  This is my first time to use a doily in a card, and I was excited.

For this card, I used a stamp from the Scripture Collection 2 set.  Because my doily is white, I picked a background cardstock that would work.  And from there I was able to decide which other elements to use. 


Since I wanted to layer with my doily but still wanted it to show, I stamped and heat embossed my ODBD sentiment on vellum. And for more texture, I put a contrasting color die cut between the vellum and the doily.  As for my main embellishment, I layered two flowers then adhered micro beads in the center.


The tiny blue pearls on the edge are actually accents for acrylic nails, adhered with Glossy Inkssentials.


Materials used:
cardstock/dp:  Wassau, vellum, leftovers
image/sentiment:  Our Daily Bread Designs (Scripture Collection 2)
ink:  Tsukineko
tools:  Spellbinders, Heartfelt Creations
embellishments:  paper doily, flowers (Forever In Time), micro beads, pearls
adhesive:  Scotch, Zots, Fiskars, Glossy Inkssentials


Just so you know, the host of this challenge is Betty Wright, and you can see her amazing work by clicking here.  You should also check out Angella Crocket's take on this fun challenge here.
   
Want to give this challenge a shot?  You could win a $15 gift certificate to the ODBD Store.  All you need to do is use a doily in your card, and preferably an ODBD stamp.  Head on to Our Daily Bread Designs blog for more details.

'Til next blog!


Wednesday, July 27

Together

The following days are important for each and every person living in America.  The US Government will make a decision soon on how the national debt is going to be handled.  For months up to these past few days, the members of the Congress and the President have been bumping heads in figuring out the best step to take.  I don't understand the specifics that well, but I do know that if a bill is not at a certain period, the government will not function in a sense, and everything will most likely be at a standstill as bills won't get paid, constructions will be stopped, etc.  Here in Michigan, ongoing improvements in several airports were already halted and workers were sent home on Monday alone.  I really hope that whatever the decision will be, is that it's for the best.  And that everybody is ready to make a sacrifice in one way or another, and no longer complain about what they will lose or won't get.  If we keep thinking only of ourselves, this country will fall.  But together, we can do something great.

The current situation inspired me to make this card:


Materials used:
cardstock/dp:  Stampin' Up, DCWV, @theoffice, leftovers
ink:  Tsukineko
tools:  Spellbinders, Martha Stewart corner punch
embellishments:  rhinestones
adhesive:  Scotch, Glossy Inkssentials, mounting tape

I still had stamped circles leftover from a similar project last week called Best Friend Ever.  And since I used all Unity stamps in this card, it's also going to be another entry for their challenge this month called "Circles, Circles, Circles..."

'Til next blog!

Tuesday, July 26

Desk Calendar Tutorial

Happy Tuesday!  As promised, here's a simple tutorial of yesterday's desk calendar project.  I will not go to the aesthetics, but focus more on the base.  Once you are able to make the base, you can make your own twist in making the calendar pages.  With my version, the calendar pages were stamped using Inque.  If you don't have a calendar stamp, you can always print to size.

The key to this project is the weight of your cardstock.  The heavier, the better.  You can even use cardboard or chipboard.  The more weight, the more pages you can put on your calendar.  The one I made yesterday was a monthly calendar covering only one school year, making it a total of 10 pages. 

First, you will need a 5.25 x 10 inch cardstock, then scored at these measurements starting from the left:  4, 5.5 and 8.75.  This will be our positive side.


Flip your cardstock over, and measure 2.25 inches from the left.  Draw a straight line with a pencil.  After that, mark an inch from the top and bottom edge.  This is our negative side.  I marked my lines with red so you can see better.  You can also see the scored lines from the opposite side.


Flip to the positive side again, and start folding your scored lines this way:


Flipping back to the negative side, make a half circle cut on the right side of the line that we drew earlier.  I used the Basic Grey Notch and Die Tool, but you can just draw with a coin or any circle and cut with a craft knife.

Before the next step, this is the best time to ink the edges or apply color to your base. 

Still on the negative side, we will apply adhesive on the opposite side of the 4" and 5.5" score lines.  Once it's secure, this is how it should look like:


And finally to secure the stand, you can fold down the circle tabs we made earlier.  This is how it will look like on the positive side:


The tabs will lock the 1.25" flap underneath.


To make the base sturdier, adhere a 5 x 3.75 cardstock to where the calendar pages are going to be.  Also adhere a 5 x 1 strip of cardstock on the area where the months will be.


Then at the back, attach another 5 x 3 cardstock.


From this point, you can start adding your calendar pages and other embellishments.  In my sample here, I inked the edges of my white base before assembly.  And I adhered a reinforcement black cardstock before I attached my calendar pages.  There is a reinforcement cardstock in the back as well.


I'd love to see your take on this project.  When you do give it a shot, please give credit and link back to Tinker Planet.

'Til next blog!

Monday, July 25

School Desk Calendar

Hello fellow crafter!  I hope you had a great weekend.  I would like to start this week with a desk calendar I designed recently.  This is meant for use in our high school office when we start the new school year in September.

I was fortunate to have a calendar stamp set from Inque called Clear Your Calendar.  It not only has the grids, but the months days and dates as well.  The base only requires a 5.25 x 10 inch cardstock.  This is how it looks like flat and unassembled:


When it's set up, it looks like this:


You just peel off each month, which is easy because I only put the months and pages with brads.


Materials used:
cardstock/dp:  Georgia Pacific, copy paper, leftovers
stamp:  Inque
ink:  Tsukineko, Stampin' Up, Spica
tools:  Spellbinders, Sizzix, Basic Grey Notch and Die Tool
embellishments:  brads

Please check back tomorrow for a very easy tutorial.

'Til next blog!

Saturday, July 23

Latest Cross Stitch Project

Happy Saturday, dear reader!  I have a question for you.  What do you have in the background while you are crafting?  I usually watch Filipino shows online while I play in my craft room.  It has become a habit of mine, as I don't like to just sit and watch.  When I'm in front of the TV, I would often work on a cross stitch or crochet project. 

Ok, too much blabber... let me just show you my latest cross-stich project that I finished yesterday.


It is called the Fractal 229 Bookmark from Cross-Stitch Collectibles, my favorite cross-stitch website.  This pattern is one of their monthly freebies, and is also their second pattern that I finished, the first being Bend In The Road by Cezanne.  Because I wasn't so diligent in doing this project, it took me almost 2 years to finish.

Well, I still haven't figured out what cross-stitch pattern to do next, but I'm thinking of something patriotic. 

And if you're not busy, please check out my other cross-stitch projects by clicking here.


'Til next blog!

Something Different

Happy Saturday, dear reader!  I have a question for you.  What do you have in the background while you are crafting?  I usually watch Filipino shows online while I play in my craft room.  It has become a habit of mine, as I don't like to just sit and watch.  When I'm in front of the TV, I would often work on a cross stitch or crochet project. 

Speaking of which, as some of you may already know, I like to do other kinds of crafts like beading, quilting, crochet, stained glass, cross stitching, and I also tried ceramics.  I still would like to learn more if given the chance.

Ok, too much blabber... let me just show you my latest cross-stich project that I finished yesterday.


It is called the Fractal 229 Bookmark from Cross-Stitch Collectibles, my favorite cross-stitch website.  This pattern is one of their monthly freebies, and is also their second pattern that I finished, the first being Bend In The Road by Cezanne.  Because I wasn't so diligent in doing this project, it took me almost 2 years to finish.

Well, I still haven't figured out what cross-stitch pattern to do next, but I'm thinking of something patriotic. 

And if you're not busy, please check out my other cross-stitch projects by clicking here.

'Til next blog!

Friday, July 22

Poker Party Invitations Set

I have a friend who loves to play poker.  She also taught me how to play Texas Hold 'Em, when she invited me to one of her poker parties.  I enjoyed my first try at poker, and the succeeding poker nights as well.

So when I saw these invitations at Big Lots, I thought of my friend right away.  They would be perfect for one or two poker parties.


The first thing that came to mind is the EK Success edge punch that I bought on clearance a long time ago.  I also get to use a lot of my red and black cardstock scraps. 

So I made two batches of invitations.  For the first set, I didn't touch the card, but I added a border on the envelopes.


And for the second set, I covered the queen on the cards with layered punched borders.


And then, I put the two sets of invitations in a cardstock pouch.  I just used brads and twine for closure.


Materials used:
cardstock/dp:  leftovers
tools:  EK Success edge punch
embellishments:  brads
adhesive:  Scotch
misc.:  Hallmark invitation cards set, twine

 'Til next blog!

Thursday, July 21

Best Friend Ever

Unity ChallengeHello crafty friends!  I'm sharing with you a card I made for this month's Unity challenge

Unity is one of my favorite stamping brands.  I learned about them through SplitCoastStampers, and I'm proud to say that I was one of their many first customers.  It's nice to see how much they have grown as a company.

Anyway, their challenge for this month is the incorporation of circles in our project.  The Just Circles set is perfect for this challenge.  And when I saw one of the sentiments from the Singing Souls set, I thought it was perfect for the card I was going to make.

And without further ado, here's my Circles Card:


The punch I used for the edges is the same punch I used to make the blue flower.  It's called the Dimensional Flower Punch by EK Success.  And it's one of my new favorite tools. 


Materials used:
cardstock/dp:  Stampin' Up, @theOffice, DCWV, leftovers
image/sentiment:  Unity
ink:  Tsukineko, Spica
tools:  EK Success Dimensional Flower Punch, Martha Stewart corner punch, Spellbinders
embellishments:  rhinestones, bead, crystal stickers (Sasha Collection)
misc.:  Shimmer Spritz
adhesive:  Scotch, Inkssentials Glossy Accents, Glue Dots, mounting tape

'Til next blog!

Wednesday, July 20

Playing with Dimensional Flower Punch

Hello crafty reader!  During my last Joann's visit, this new tool caught my eye:


It's a Dimensional Flower Punch by EK Success, meant to create dimensional flowers.


I have seen a lot of crafters making flowers out of punched edges, but I haven't seen an acutal edge punch for that particular reason.  I thought that was pretty cool.  And aside from its original purpose, you can still use this punch as a typical border or edger as well.

The instructions tell you to punch a 12 inch strip of designer paper.  And to create your 3D flower, you need two 12 inch long petal strips.  It took me several tries to make a decent flower, and this was the best one:


After playing some more, I was able to make this ornament, composed of 6 flowers:


I can't wait to play some more!  This sure is a fun tool to have.  Its MSRP is $17.99, but Joann's had all their scrapbooking tools at 30% off, so I got a better deal.

'Til next blog!

Tuesday, July 19

Paper Fan Tutorial

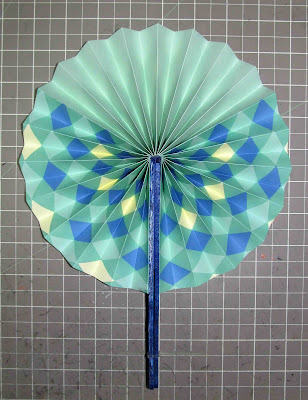
Hello crafty reader!  Yesterday I posted my paper fan project.  There's some story behind it, and now I'm really glad that I am able to share with you the tutorial today.  Here are a couple more paper fans that I made:


This tutorial will only cover the basic steps, as there are many ways to embellish this paper fan.  Here are the materials you will need:


  1. Two 7" paddle sticks, or something similar.  I'm basing my measurements from the ones by Tree House Studio bought from Hobby Lobby.
  2. Three pieces of double-sided designer paper, measured at 4 x 12 inches.
  3. Paper piercer or similar.  The one I used is actually a paper quilling tool.
  4. Stretchable cord or wire, oftenly used for Jewelry making.
  5. Needle big enough for your stretch cord to go through.
  6. Cardstock cut at 1/2 x 6 and 3/8 inches.  We will call this Cardstock A.
  7. Cardstock cut at 3/4 x 7 and 5/8 inches.  We will call this Cardstock B.
  8. Bone folder and/or scoring tool.
  9. Your adhesive of choice.  I used Scotch ATG and Zips Clear Adhesive Lines.
  10. Optional:  ink and edge punch to match your designer paper.
Let's begin by scoring our paper and cardstock.

For the designer paper, score all 3 pieces at 3/4 inches from left to right:


For Cardstock A, we will score each end at 3 inches, leaving 3/8" gap in between:


For Cardstock B, we will score each end at 3.5 inches, leaving 5/8" gap in between:


Now we can put our embossing tool away.  It's time to fold our designer paper like this:


After that, we will adhere them together.  We will call this our main piece.


Scrunching our main piece, we will apply adhesive to secure one end:


Then we will pierce a hole:


And with a needle and stretch cord, we will totally secure this end of the main piece:


Tie a knot three times:


*Side note: It's easier to pierce a hole and tie a stretch cord on your main piece before you apply the adhesive.

Next step:  generously apply adhesive on Carstock A and attach to the secured end of our main piece.  Here, I would add more glue to really secure the main piece to Cardstock A.


This is how your main piece should look like:


Next step:  apply adhesive on both ends of your main piece, and attach the handles on both sides like so:


At this stage, you can punch each end of your Cardstock B, or leave it as is:


Apply adhesive (generously) on Cardstock B, and attach to the main piece:


For closure, I just used a small clear rubber band:


This is how it looks like opened:


And that's it... we're done!  Easy, right?  Once you've made your first paper fan, it's a breeze to do the next ones. 

I would love to know what you think, especially if it worked for you or not.  When you do give this a shot, please give credit and link back to Tinker Planet.

'Til next blog!